YOLO 板端部署 目标检测
Copyright © Quectel Wireless Solutions Co., Ltd. 2026. All rights reserved.
YOLO 是什么
YOLO(You Only Look Once,只看一眼)是一种基于深度卷积神经网络(CNN)的 实时目标检测算法。它由 Joseph Redmon 等人于 2016 年提出,开创了“单阶段(one-stage)”目标检测的先河。
传统目标检测算法(如 R-CNN 系列)通常分两步:先“找候选区域”,再“对每个区域分类”,速度慢。而 YOLO 的核心思想是:
把整张图片一次性地送入网络,直接在 一次前向推理 中同时输出:
图像中每个目标的 类别(如 person、mouse、keyboard、car…)
每个目标的 边框位置(bounding box)
每个目标属于该类别时的 置信度(confidence)
YOLO 用途
YOLO 是当前最流行的通用目标检测算法之一,用途非常广泛:
应用方向 |
说明 |
|---|---|
安防监控 |
实时检测行人、车辆、陌生人等 |
智能交通 |
车流量统计、车牌识别、违章抓拍 |
工业质检 |
检测产品缺陷、位置定位、抓取引导 |
智慧零售 |
客流统计、货架缺货识别、行为分析 |
自动驾驶/机器人 |
障碍物、车道线、目标识别与避障 |
医疗影像 |
病灶区域定位与检测 |
人机交互 |
识别鼠标、键盘、手势等物体(本 Demo 即演示该场景) |
部署
依赖清单
组件 |
说明 |
|---|---|
Python 3.13 |
设备自带 |
OpenCV(python3-opencv) |
图像读取、摄像头采集、画框 |
numpy |
数值计算 |
onnxruntime |
CPU 推理引擎 |
yolov8n.onnx / yolo11n.onnx |
YOLO 检测模型 |
环境部署
adb shell "mkdir -p /opt/yolo && cd /opt/yolo"
# 安装系统依赖(OpenCV、numpy,设备自带 Python 3.13)
adb shell "apt update && apt install -y python3-opencv python3-numpy"

# 下载 YOLO 模型
curl -sL -o yolo11n.onnx \
  https://github.com/ultralytics/assets/releases/download/v8.3.0/yolo11n.onnx

adb push yolo11n.onnx /opt/yolo/

# 下载兼容版 onnxruntime(aarch64 wheel,针对无 SVE/dotprod 的 ARMv8)
#  在宿主机(x86_64)下载通用 aarch64 wheel,再推送到设备解压
curl -sL -o onnxruntime.whl \ https://files.pythonhosted.org/packages/81/0d/13bbd9489be2a6944f4a940084bfe388f1100472f38c07080a46fbd4ab96/onnxruntime-1.22.1-cp313-cp313-manylinux_2_27_aarch64.manylinux_2_28_aarch64.whl

adb push onnxruntime.whl /opt/yolo/
adb shell "cd /opt/yolo && python3 -m zipfile -e onnxruntime.whl /opt/yolo/ort"
脚本
目标图片:
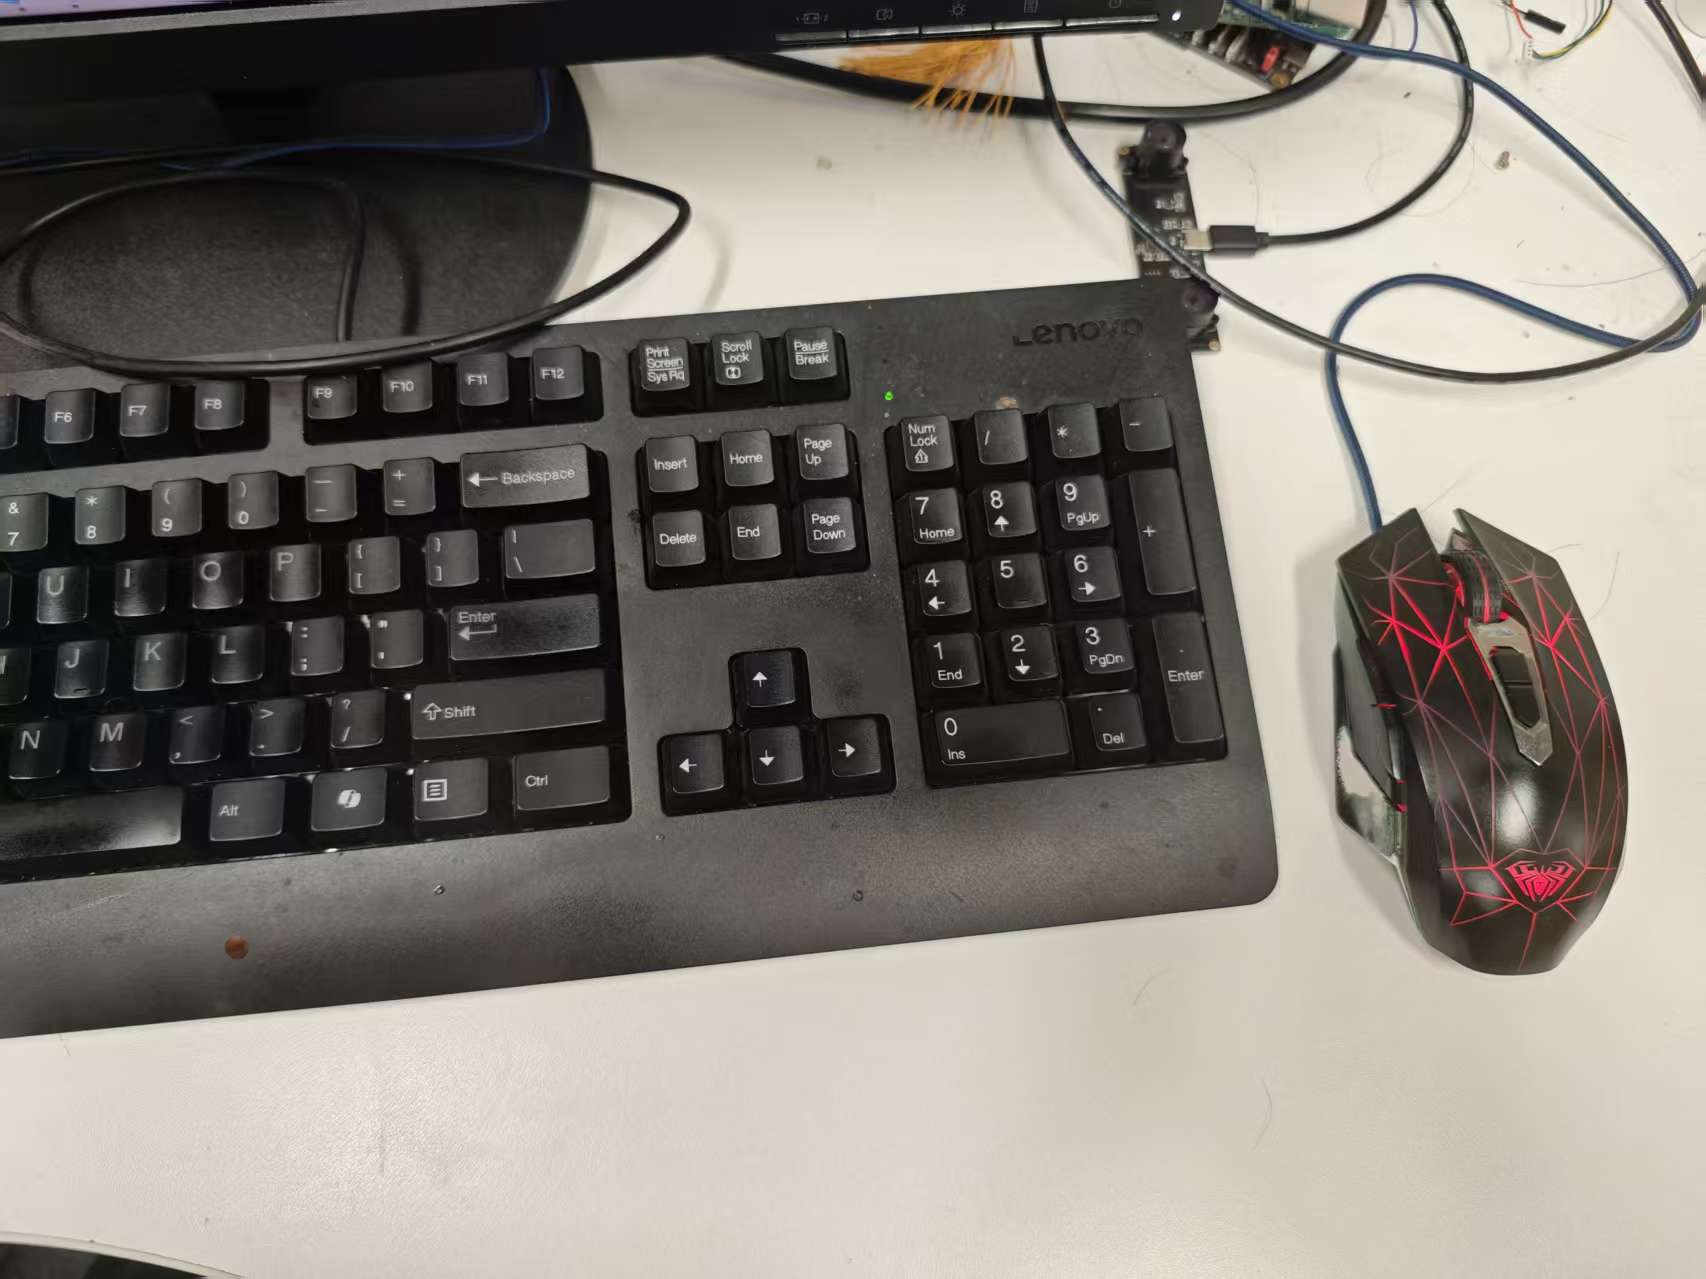
脚本代码:
#!/usr/bin/env python3
import argparse
import os
import sys
import time

# 优先使用设备上兼容的 onnxruntime(/opt/yolo/ort,针对无 SVE/dotprod 的 ARMv8 编译)
_ORT_DIR = "/opt/yolo/ort"
if _ORT_DIR not in sys.path and os.path.isdir(_ORT_DIR):
    sys.path.insert(0, _ORT_DIR)

import cv2
import numpy as np
import onnxruntime as ort

# ---------- COCO 80 类 ----------
COCO_CLASSES = [
    "person", "bicycle", "car", "motorcycle", "airplane", "bus", "train", "truck", "boat",
    "traffic light", "fire hydrant", "stop sign", "parking meter", "bench", "bird", "cat",
    "dog", "horse", "sheep", "cow", "elephant", "bear", "zebra", "giraffe", "backpack",
    "umbrella", "handbag", "tie", "suitcase", "frisbee", "skis", "snowboard", "sports ball",
    "kite", "baseball bat", "baseball glove", "skateboard", "surfboard", "tennis racket",
    "bottle", "wine glass", "cup", "fork", "knife", "spoon", "bowl", "banana", "apple",
    "sandwich", "orange", "broccoli", "carrot", "hot dog", "pizza", "donut", "cake",
    "chair", "couch", "potted plant", "bed", "dining table", "toilet", "tv",
    "laptop", "mouse", "remote", "keyboard", "cell phone", "microwave", "oven", "toaster",
    "sink", "refrigerator", "book", "clock", "vase", "scissors", "teddy bear", "hair drier",
    "toothbrush",
]
# 目标类别索引(COCO):mouse(64) / keyboard(66)
TARGET_IDS = [64, 66]

INPUT_SIZE = 640  # YOLOv8n/YOLO11n 输入尺寸
CONF_THRESH = 0.25
IOU_THRESH = 0.45


def letterbox(img, size=640):
    """等比缩放并填充到 size x size,返回缩放比和 (pad_x, pad_y)。"""
    h, w = img.shape[:2]
    r = min(size / h, size / w)
    new_w, new_h = int(round(w * r)), int(round(h * r))
    resized = cv2.resize(img, (new_w, new_h), interpolation=cv2.INTER_LINEAR)
    pad_x = (size - new_w) // 2
    pad_y = (size - new_h) // 2
    canvas = np.full((size, size, 3), 114, dtype=np.uint8)
    canvas[pad_y:pad_y + new_h, pad_x:pad_x + new_w] = resized
    return canvas, r, pad_x, pad_y


def preprocess(img):
    """BGR -> RGB -> NCHW float32 [0,1]"""
    x, r, px, py = letterbox(img, INPUT_SIZE)
    x = cv2.cvtColor(x, cv2.COLOR_BGR2RGB).astype(np.float32) / 255.0
    x = x.transpose(2, 0, 1)[None, ...]  # 1x3x640x640
    return np.ascontiguousarray(x), r, px, py


def postprocess(output, r, px, py, orig_shape, conf_thresh, iou_thresh):
    """输出 1x84x8400 -> NMS -> 列表 [(cls, conf, x1,y1,x2,y2)](原图坐标)"""
    preds = output[0]  # 1x84x8400
    boxes = preds[:4]              # cx, cy, w, h (归一化)
    scores = preds[4:]             # 80 类置信度
    # 到原图 scale
    rs = 1.0 / r
    cx = (boxes[0] - px) * rs
    cy = (boxes[1] - py) * rs
    w = boxes[2] * rs
    h = boxes[3] * rs
    x1 = cx - w / 2
    y1 = cy - h / 2
    x2 = cx + w / 2
    y2 = cy + h / 2

    H, W = orig_shape[:2]
    cls_ids = scores.argmax(0)
    confs = scores.max(0)
    keep = confs >= conf_thresh
    x1, y1, x2, y2, cls_ids, confs = (
        x1[keep], y1[keep], x2[keep], y2[keep], cls_ids[keep], confs[keep])

    dets = np.stack([x1, y1, x2, y2, confs, cls_ids.astype(np.float32)], axis=1)
    picks = nms(dets, iou_thresh)

    results = []
    for i in picks:
        bx1, by1, bx2, by2, cf, ci = dets[i]
        bx1 = max(0, min(W, bx1)); by1 = max(0, min(H, by1))
        bx2 = max(0, min(W, bx2)); by2 = max(0, min(H, by2))
        results.append((int(ci), float(cf), int(bx1), int(by1), int(bx2), int(by2)))
    return results


def nms(dets, iou_thresh):
    """简单 NMS,按置信度从高到低贪心。dets: Nx6 (x1,y1,x2,y2,conf,cls)"""
    if len(dets) == 0:
        return []
    order = dets[:, 4].argsort()[::-1]
    x1, y1, x2, y2 = dets[:, 0], dets[:, 1], dets[:, 2], dets[:, 3]
    areas = (x2 - x1) * (y2 - y1)
    picks = []
    while order.size > 0:
        i = order[0]
        picks.append(i)
        xx1 = np.maximum(x1[i], x1[order[1:]])
        yy1 = np.maximum(y1[i], y1[order[1:]])
        xx2 = np.minimum(x2[i], x2[order[1:]])
        yy2 = np.minimum(y2[i], y2[order[1:]])
        w = np.maximum(0.0, xx2 - xx1)
        h = np.maximum(0.0, yy2 - yy1)
        inter = w * h
        iou = inter / (areas[i] + areas[order[1:]] - inter + 1e-9)
        order = order[1:][iou <= iou_thresh]
    return picks


def draw(img, results):
    """在原图上画框和标签。"""
    for cls_id, conf, x1, y1, x2, y2 in results:
        color = (0, 255, 0) if cls_id in TARGET_IDS else (255, 200, 0)
        cv2.rectangle(img, (x1, y1), (x2, y2), color, 2)
        label = f"{COCO_CLASSES[cls_id]} {conf:.2f}"
        (tw, th), _ = cv2.getTextSize(label, cv2.FONT_HERSHEY_SIMPLEX, 0.6, 2)
        y_txt = y1 - 4 if y1 - th > 4 else y1 + th + 4
        cv2.rectangle(img, (x1, y1 - th - 8), (x1 + tw + 6, y1), color, -1)
        cv2.putText(img, label, (x1 + 3, y_txt),
                    cv2.FONT_HERSHEY_SIMPLEX, 0.6, (0, 0, 0), 2)
    return img


class YOLODetector:
    def __init__(self, model_path="/opt/yolo/yolo11n.onnx"):
        self.sess = ort.InferenceSession(
            model_path,
            providers=["CPUExecutionProvider"],
            sess_options=ort.SessionOptions(),
        )
        self.input_name = self.sess.get_inputs()[0].name
        print(f"[INFO] 模型加载成功: {model_path}")

    def detect(self, img, conf_thresh=CONF_THRESH, iou_thresh=IOU_THRESH):
        x, r, px, py = preprocess(img)
        out = self.sess.run(None, {self.input_name: x})
        return postprocess(out[0], r, px, py, img.shape, conf_thresh, iou_thresh)


def main():
    ap = argparse.ArgumentParser(description="YOLO 目标检测 Demo (CPU)")
    ap.add_argument("--camera", action="store_true", help="USB 摄像头实时模式")
    ap.add_argument("--device", type=int, default=0, help="摄像头设备号,默认 0")
    ap.add_argument("--image", type=str, default=None, help="静态图片路径")
    ap.add_argument("--out", type=str, default=None, help="结果输出图片路径")
    ap.add_argument("--no-show", action="store_true", help="不显示窗口(无显示器时用)")
    ap.add_argument("--model", type=str, default="/opt/yolo/yolo11n.onnx")
    ap.add_argument("--conf", type=float, default=CONF_THRESH)
    args = ap.parse_args()

    det = YOLODetector(args.model)

    # ---------- 图片模式 ----------
    if args.image:
        img = cv2.imread(args.image)
        if img is None:
            print(f"[ERR] 无法读取图片: {args.image}")
            sys.exit(1)
        t0 = time.time()
        results = det.detect(img, args.conf)
        dt = (time.time() - t0) * 1000
        print(f"[INFO] 检测到 {len(results)} 个目标, 推理耗时 {dt:.1f} ms")
        for r in results:
            print(f"  - {COCO_CLASSES[r[0]]} conf={r[1]:.2f} box=({r[2]},{r[3]},{r[4]},{r[5]})")
        draw(img, results)
        out = args.out or os.path.splitext(args.image)[0] + "_det.jpg"
        cv2.imwrite(out, img)
        print(f"[INFO] 结果已保存: {out}")
        if not args.no_show:
            cv2.imshow("YOLO Detect", img)
            cv2.waitKey(0)
            cv2.destroyAllWindows()
        return

    # ---------- 摄像头模式 ----------
    cap = cv2.VideoCapture(args.device)
    if not cap.isOpened():
        print(f"[ERR] 无法打开摄像头 /dev/video{args.device},请确认已外接 USB 摄像头")
        sys.exit(1)
    cap.set(cv2.CAP_PROP_FRAME_WIDTH, 640)
    cap.set(cv2.CAP_PROP_FRAME_HEIGHT, 480)
    print(f"[INFO] 摄像头已打开, 按 'q' 退出")
    while True:
        ok, frame = cap.read()
        if not ok:
            print("[WARN] 读取帧失败")
            break
        t0 = time.time()
        results = det.detect(frame, args.conf)
        dt = (time.time() - t0) * 1000
        draw(frame, results)
        fps = 1000.0 / max(dt, 1e-3)
        cv2.putText(frame, f"FPS: {fps:.1f}", (8, 30),
                    cv2.FONT_HERSHEY_SIMPLEX, 0.8, (0, 255, 0), 2)
        if not args.no_show:
            cv2.imshow("YOLO Detect", frame)
            if cv2.waitKey(1) & 0xFF == ord("q"):
                break
    cap.release()
    cv2.destroyAllWindows()
    print("[INFO] 结束")


if __name__ == "__main__":
    main()
把脚本和图片推送进板载设备
adb push xxx.py  /opt/yolo
adb push test.jpg  /opt/yolo

adb shell
cd /opt/yolo
python3 yolo_detect.py --image test.jpg --out out.jpg
结果如下,检测到键盘
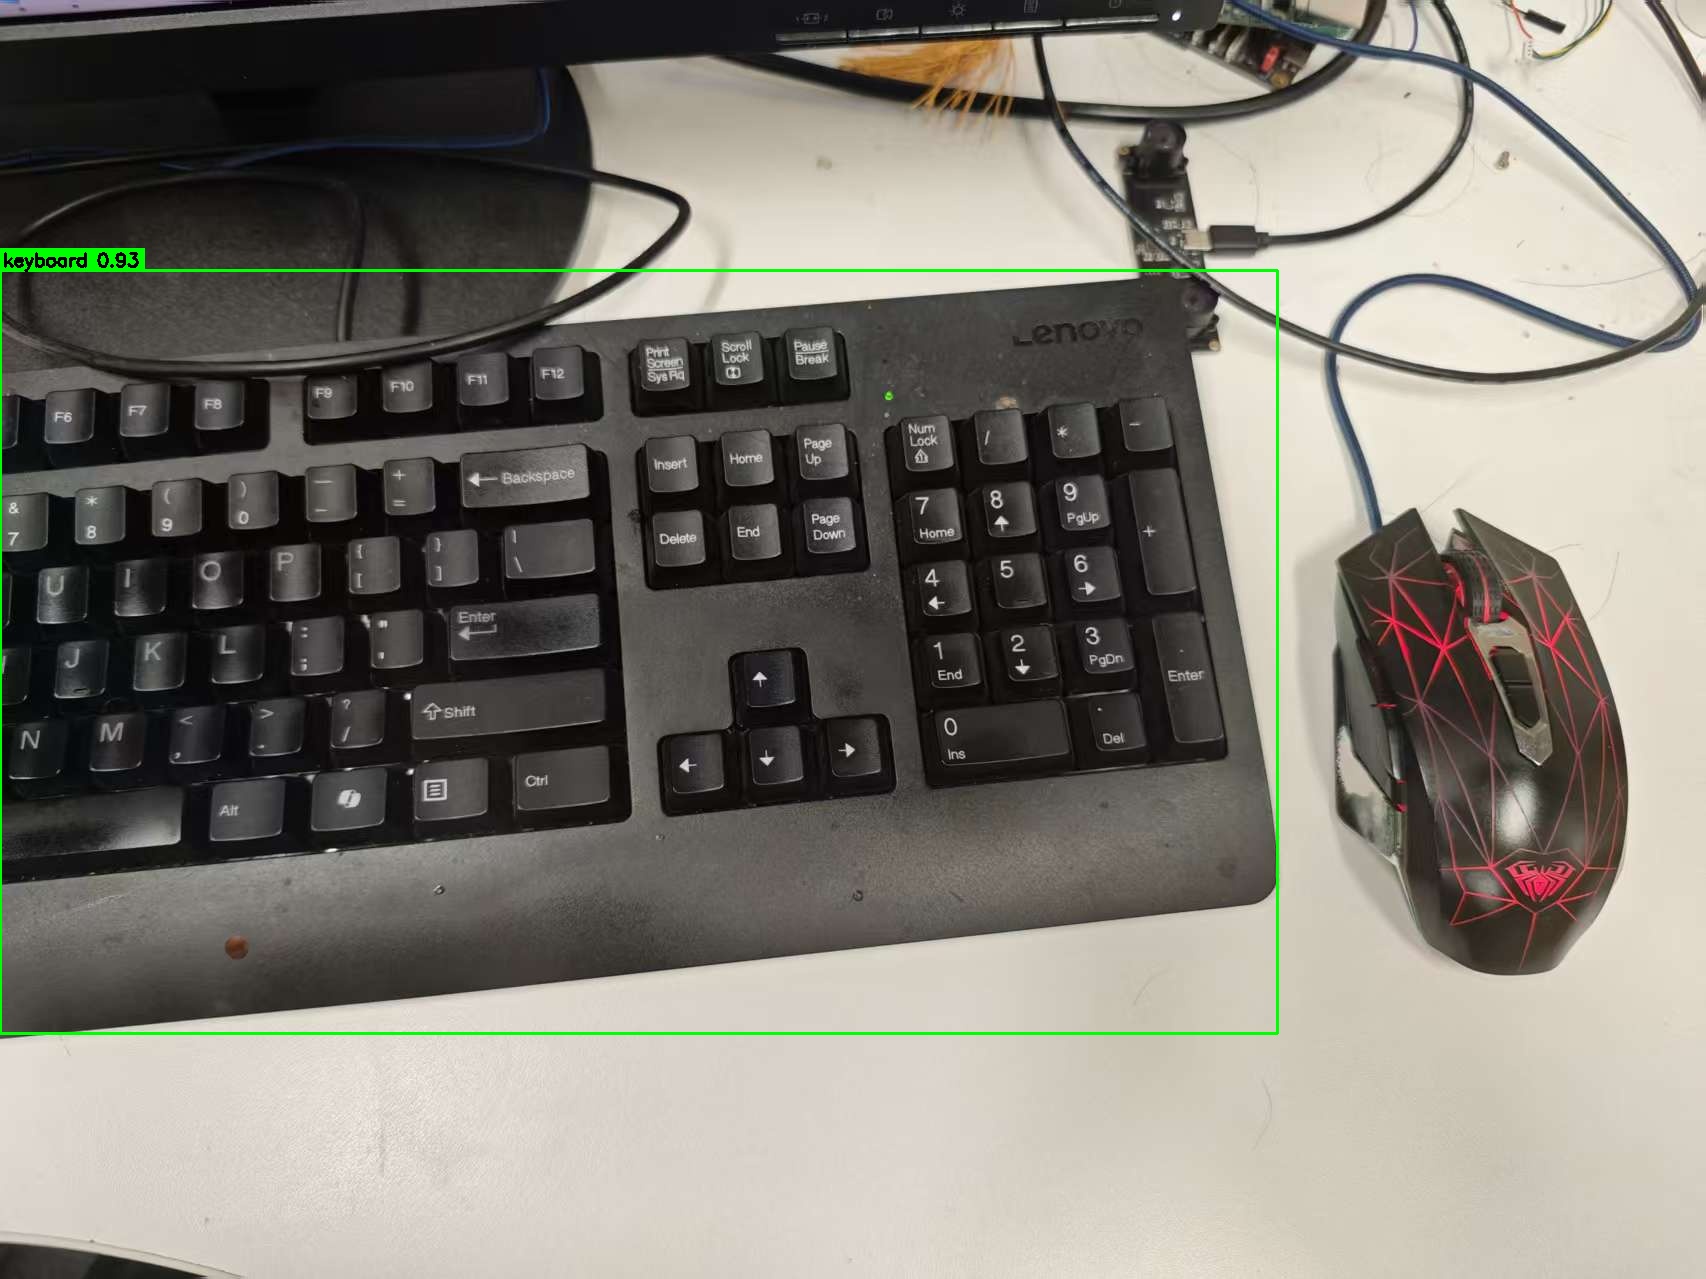
常见问题
现象 |
原因与解决办法 |
|---|---|
导入 |
使用了系统自带的、针对高版本 ARM 指令编译的 onnxruntime。请使用 |
|
没有插入 USB 摄像头,或设备号不对。请插入 USB 摄像头并确认 |
|
模型 opset 版本高于 onnxruntime 支持的版本。请使用 onnxruntime ≥ 1.21(脚本默认使用 1.22.1,已支持)。 |
检测不到目标 |
尝试降低 |